AI_Reefer
Medlem
-
Gick med
-
Senaste besök
All aktivitet
-
That is good advice Kim. I also figure I can use it for filtered drinking water at work too. I could go for a 600l Aquamedic - https://www.seaflowerstore.com/aqua-medic-premium-line-600-osmose-apparaat/ Or maybe go for the full filtered drinking water solution. But its very hard for me to find these since I cannot search google in Swedish. Let me know if anyone knows of any good solutions in Sweden that include a drinking tap and revivor. I could go up to 3000-4000 SEK I guess for the drinking water solution.
-
Hmm, I guess I will need to buy a RO set up, the pump and the salt first... Also a heater I guess too. Better start a new shopping list.
-
Happy midsummer everyone! I am wondering if their is any advantage in starting to cycle the dry rock and the sand in a plastic bin this week using just some basic tank starter kit? Its either that or I wait until the live rock and the sump, and all the fittings and pumps arrive, then start the cycle with both dry and live rock together in the main display tank. Although this would probably take a month or two longer than if I just start up the dry rock cycling in a plastic bin this week... ?
-
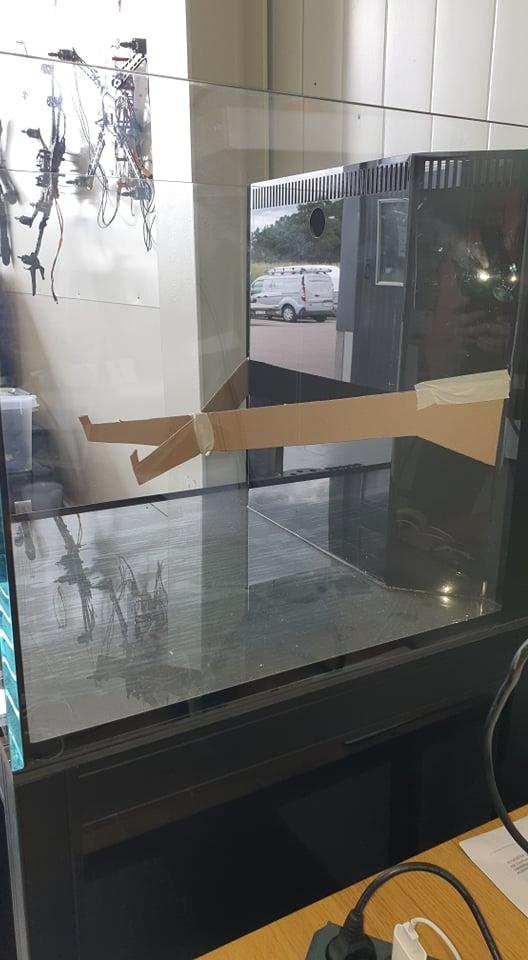
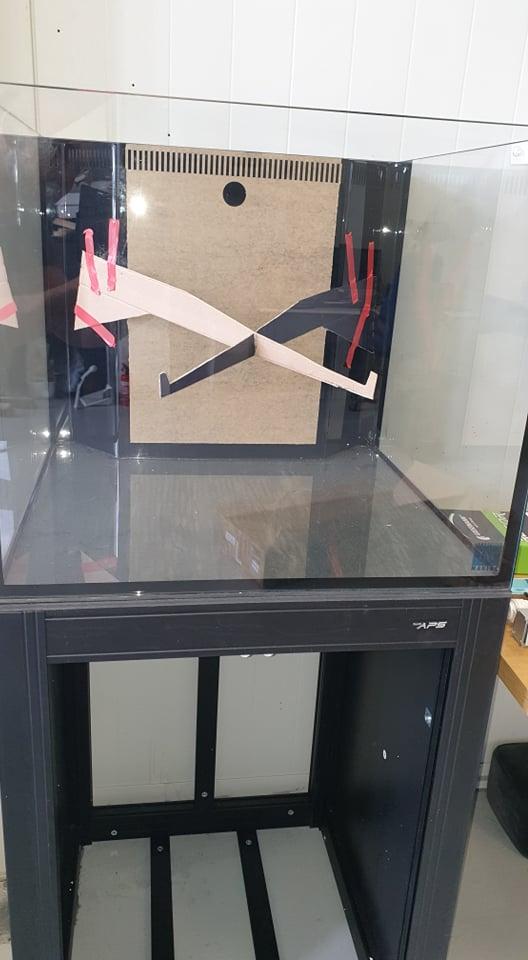
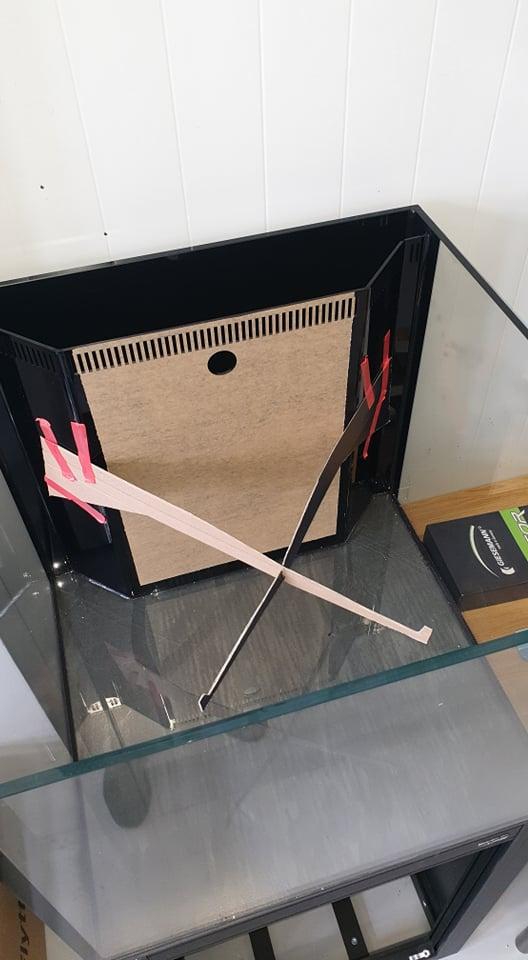
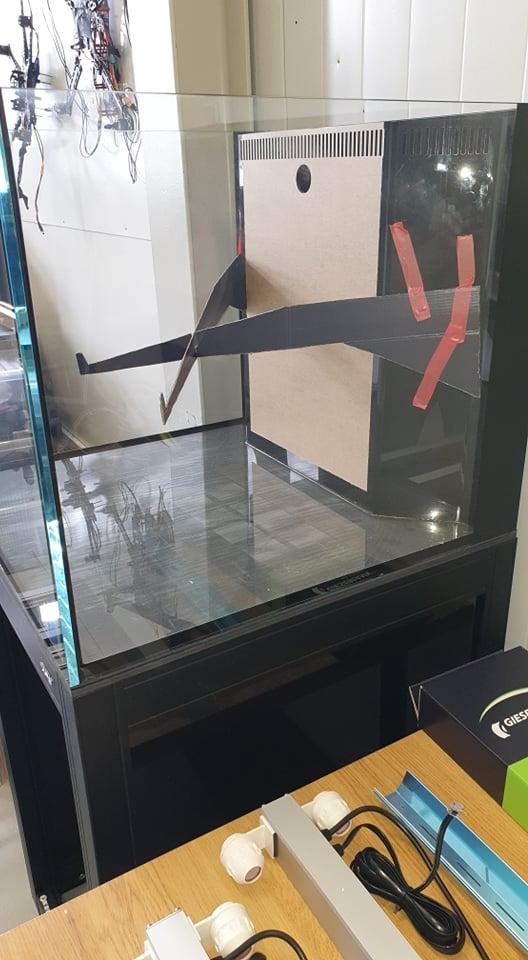
Final design for the bracing. Hopefully it's strong enough and low enough. Also with enough room to be able to clean the sand bed underneath.
-
Cardboard first draft of the structural supports....
-
Yes, the shelf is a good idea too!
-
I could be wrong about this though. I'll likely do a test run with a small piece of perspex and acrifix inside the rear overflow section. Just to check that the molecular acrifix bond really works first.
-
I.e. I think the rear balck panel is actually perspex, hence the molecular bond with Acrifix. As I agree, Silicone will not work. But Acrifix should do it.
-
The Nuvo INT 50 already has this covered. 👍
-
I agree with you on both counts. I think if it is 1cm perspex it can hold heaps of weight. The strength will depend on the bond to the rear panel. I think bonding with silicone will not work. Instead I'm thinking of taking the full risk and using a full molecular bond with Acrifix. https://interglas.se/shop/lim-till-plexiglas-679p.html ... Worst case scenario if it fails would be a couple of ugly edges on the rear panel. I'll likely drop the height too, just as you said, but that is an easy thing to do by eye when the time comes to glue.
-
This is my initial ideas for the floating reef. Pretty simple, just stick the perspex onto the angled rear panels. Then lay rock over the top by slotting the perspex into/under a few larger pieces of dry rock. Then add/glue more dry/live rock onto the larger dry-rock base frame. The idea is that this will give me a fully floating reef look. Not sure if it will really work, but I've seen other tanks that have managed similar styles with incredible results. I'm guessing that this is pretty high risk high reward strategy and may likely fail. But I'm in this for the fun of it, so may as well have some fun with it. 😉
-
Maybe I'll start with a simple flat board with the lights mounted onto the board, then the board hanging from a wire. If I do this then I can adjust the light height etc. for a few months, and get the PAR right before building the full enclosure.
-
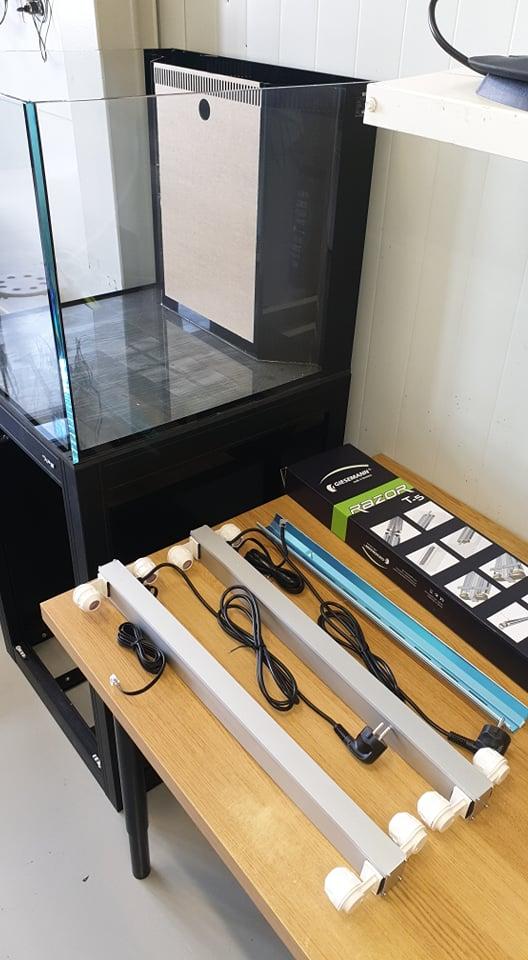
The 2x2 dimmable T5's arrived today. My plan was to build a wooden lighting enclosure similar to the one shown below. I really like the clean finish, and I'd design it so that I can either open the sides, or lift it off entirely for maintenance. https://www.reef2reef.com/ams/reef-of-the-month-march-2021-florida_reef_keeper-brandon-mchenrys-amazing-aio-sps-reef.799/
-
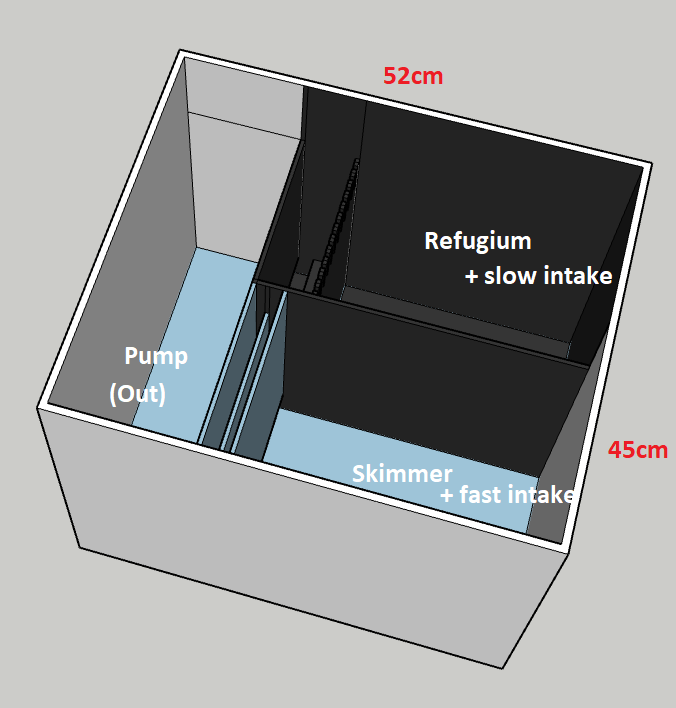
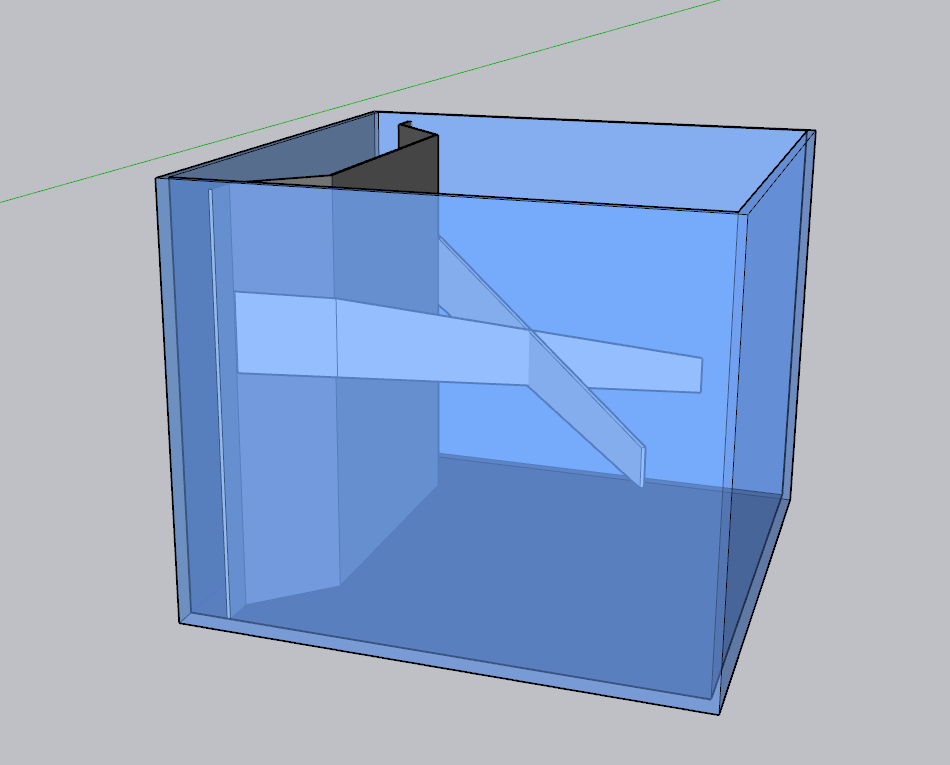
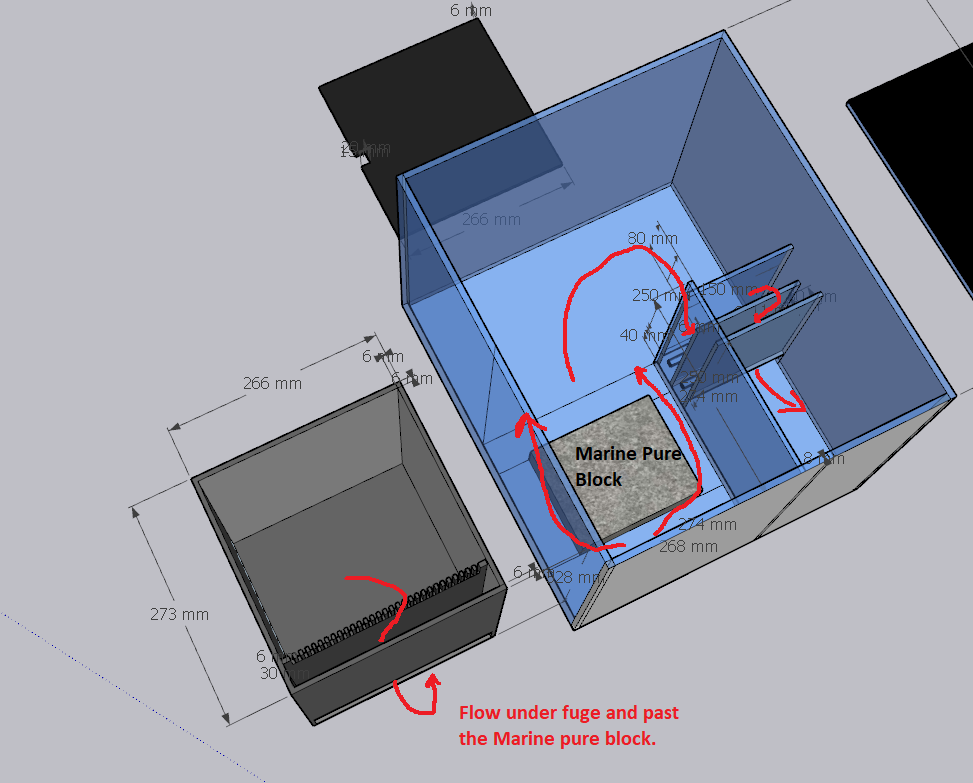
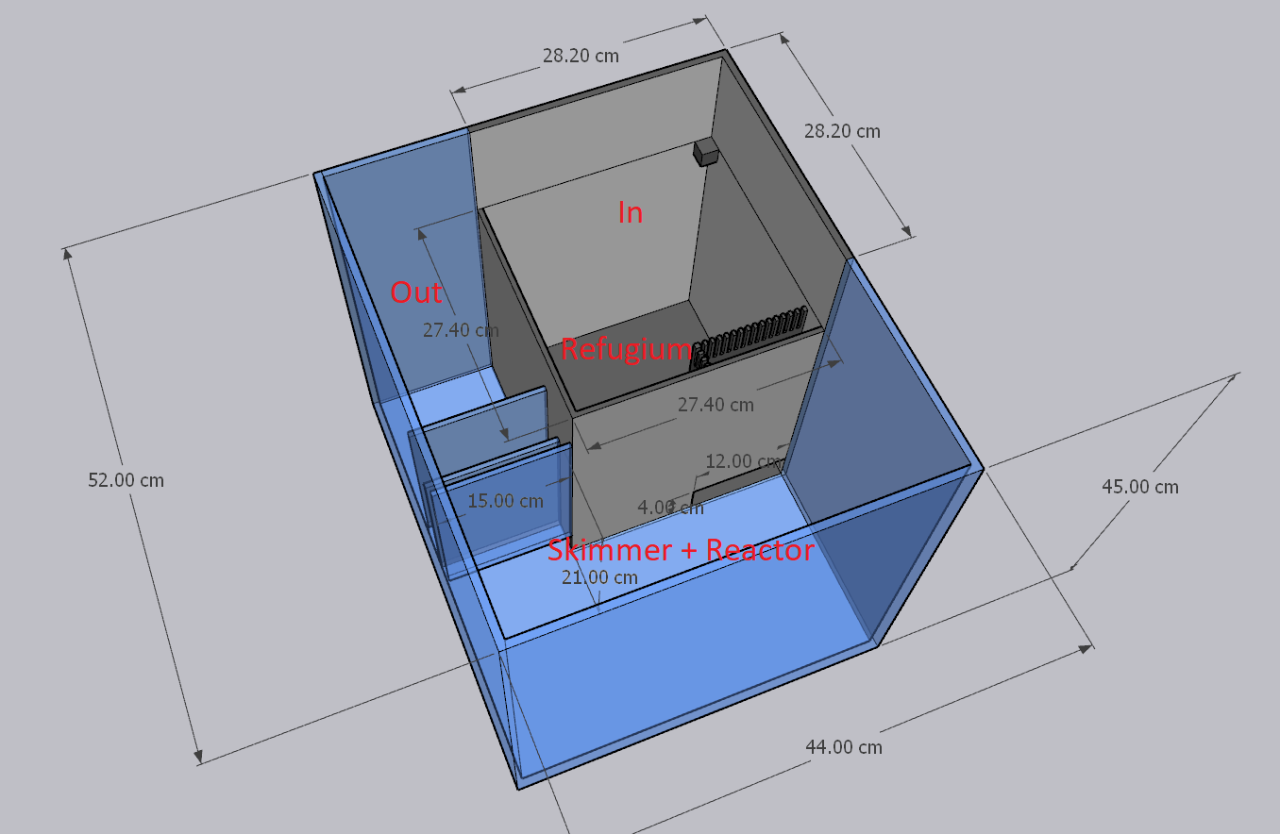
I agree with you Kim that the backstage is half the fun for a gear junkie. I had this crazy idea to maximize the use of the space and available flow by spinning the fuge 180 degrees and adding a marine pure block underneath of it. So the flow passes by either side of the block before entering the skimmer section. I am hoping to have a floating reef, which may sligthly reduce the amount of live rock in my main display. So a marine pure block could be useful to combat this. The good thing is that the sump does not need any modifications for this crazy idea. And if it doesn't work I can just revert to the previus design by removeing the marine pure block and swapping the fuge back 180 degress to its normal state. It's just a fun idea for now. Not sure if I'll ever do it.
-
Thanks for the advice Kim! Its great to hear that it may be possible to take the filter sock out of the equation. I thought maybe if the refugium was doing well I could use a very coarse filter sock, just for the big stuff, but removing it altogether would be great in the long run! This is definitely a worthy goal if possible. The reasoning for the extra water passageway was to add some coarse filter foam in there. I didn't really know if it was necessary but had seen it on some other sumps so I just copied them. I figured this would catch any overflowing cheato and be easy to remove and clean from time to time. What are your thoughts in this regard? Better to have more room for cheato, or some filter foam here. The filter foam: https://www.seaflowerstore.com/zwart-filterschuim-grof-50x50x3cm/?gclid=Cj0KCQjw8IaGBhCHARIsAGIRRYoI8f169oGli7YT9a4etH_C1tlxdKLkJAvSyBPpsWEGMFmwy0yObOgaAj_zEALw_wcB Note that there is a three stage bubble trap that I can add more filter media in if necessary just before the pump. Also, the tank I have has a large rear overflow section that can fit a lot of extra media if necessary. Essentially I have many options, but still not sure precisely what the full set-up will be. I haven't bought the sump yet but am in discussions with the manufacturer.
-
You're probably correct about that. I think part of the refugium is for the fun of having the little critters in there, and to be able to check if it increases stability by lighting it overnight. You gave me a good idea though, I can instead have the refugium as an insert box. Then if I get sick of changing filter socks, or if the refugium is too small to be any good, then I can later just remove the fuge and swap over to a roller instead.
-
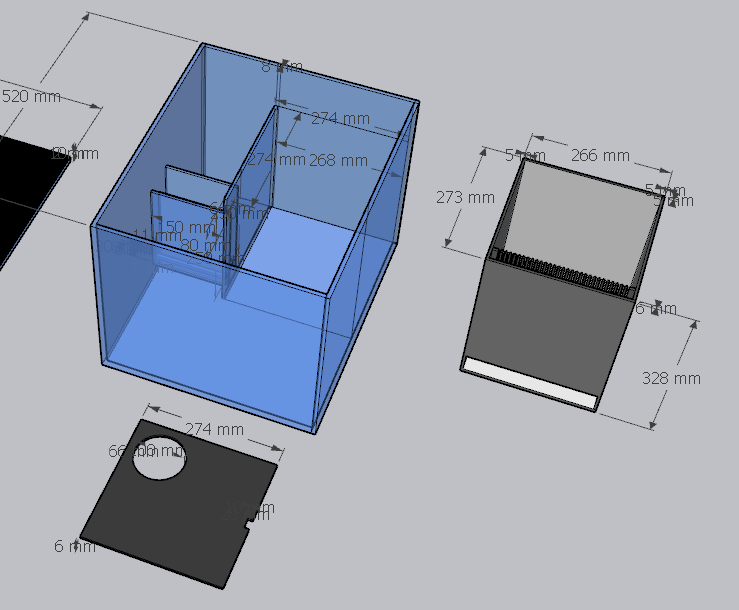
Attached below is the final draft. Provided that nothing more need to be changed, I guess I will get it custom made sometime in the next few days.

-
Perfect, thanks for the sump advice. Just what I needed.
-
Oh cool. I live in Uppsala, the tank is at my work in Boländerna, so sharing shipping could work although it'd probably save as much as the drive to Stockholm would cost to pick it up Nice that you're going to Germany, cool to see that awesome store. I'll have to make sure my tank is ready for the Aussi live rock when it arrives. Today I bought the new front door and tomorrow I will order the custom made sump. I guess my blueprint is good, since no-one has told me that it has any obvious errors yet?
-
Wow... Whitecorals is a nice store. I have not seen them before either. Thanks for the link. I saw that they even have some real Australian live rock, that is perfect, I can actually have a little piece of home living in my tank. 😀
-
That sounds like good advice. Is there a "best practice" to avoid introducing pests like aiptasia? I guess you don't really quarantine/inspect your first bit of live rock? Also is there any online retailer that has particularly safe/well-quarantined live rock in Sweden/EU. Or should I just head down to my LFS and pick up whatever they have on offer?
-
I had planned on using dry rock and maybe something like a RedSea starter kit. The price of live rock is not a problem, and the slow speed of dry rock is also not an issue. I only chose dry rock over live rock because I thought live rock could maybe introduce unwanted pests. I'm still open to adding some live rock if recommended since I hear it has many advantages. I've already bought some dry-rock below, although I haven't started with aqua scaping or anything of that sort yet. https://www.drakfisken.se/korallsand/fiji-white.html https://www.drakfisken.se/konstgjord-levande-sten/natures-ocean-coral-base-rock.html https://www.drakfisken.se/lim/seachem-reef-glue.html My next step is to confirm that the sump looks correct and normal, then I will try get it custom made. After I have the sump in, then I will have to do the plumbing, Then I can get started on bringing the rock to life and adding an ATO set/up. Would you recommend live rock? I don't really know the risk/reward in this regard. I figure since I am not in any rush, dry rock should be sufficient?
-
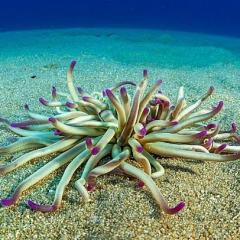
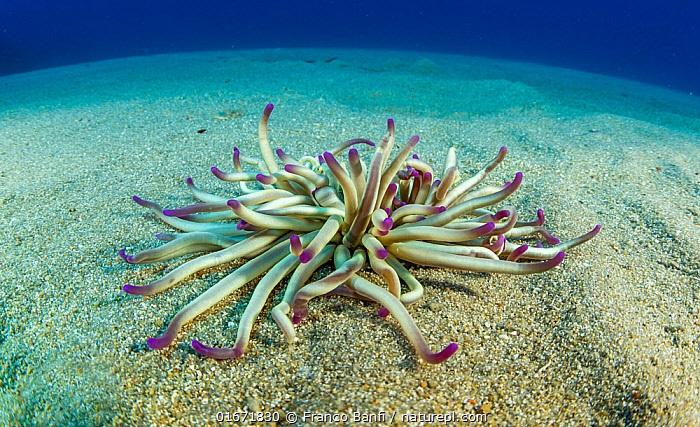
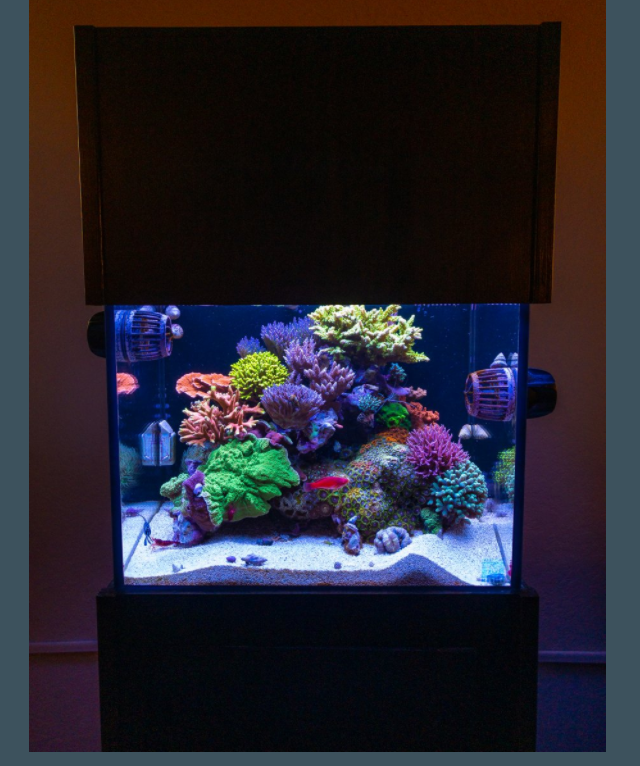
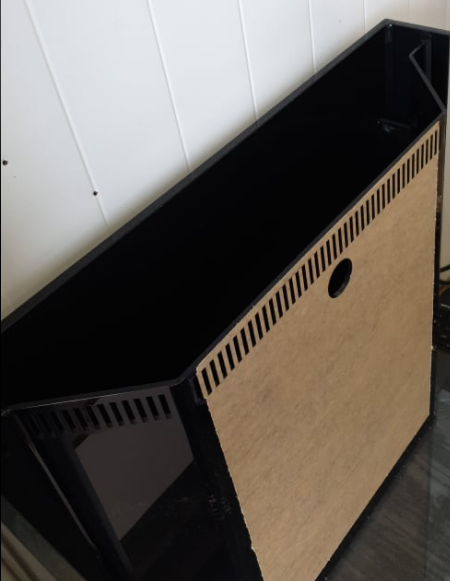
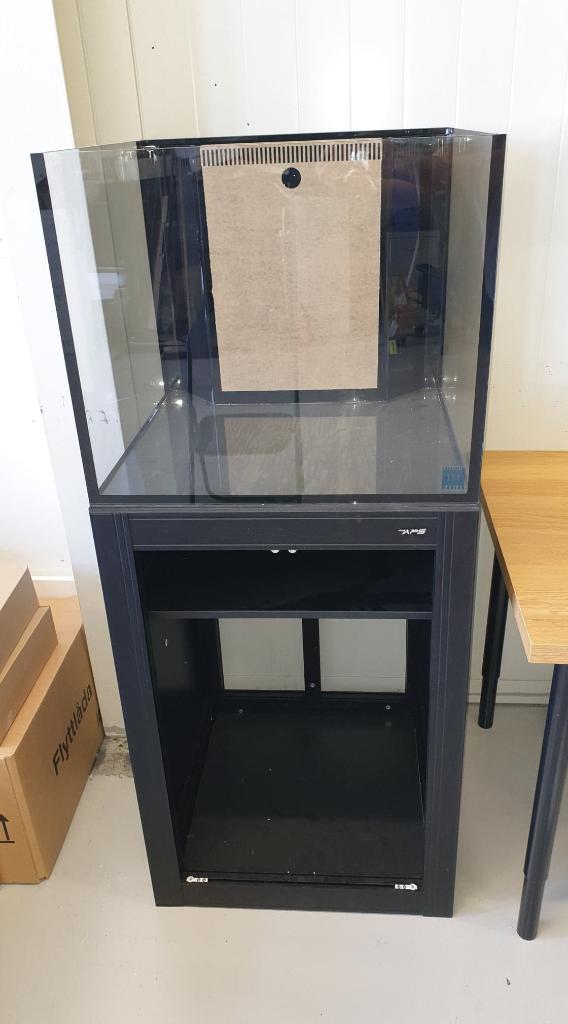
Hi all, I'm an Aussi from Cairns living in Sweden. I had a reef tank when I was a kid, but that was 20 years ago. I figure its time to dive back into the hobby. I'm keen to get into it, but I have very little knowledge on the topic, so I'm likely about to make many noob mistakes along the way. I thought the best way to learn from others would be to keep in touch with my local forum. I'm hoping that this reef keeping community may save me from walking into obvious mistakes, and give me suggestions as I blindly stumble through the early stages of learning this complex and exciting hobby. Attached below are my aspirations and some of my initial plans, all be it just ideas for now. Please push me in any direction that may save me and my tank from errors or potential catastrophe along the way. Overall goal: To eventually arrive at a happy and healthy SPS dominant tank. I enjoy high-tech gear and automation, part of the fun will hopefully be the systems and equipment. Stretch goals: I think "floating reefs" look absolutely awesome. I'd also love to be able to keep a sand-dwelling anemone and clowns if possible, although I guess these can harm the SPS? Long term goals: To be able to use some of the nice gear and lessons from this tank to start a new, larger tank in the future. Set-up: Note that the red text is an item that is just a guess for now. I have not yet purchased these items so they can be changed if need be. Tank: Nuvo INT 50 (fifty gallon Cube) DIMS: 60 x 60 x 50(h) cm (23.6” x 23.6” x 19.7(h)”) Stand: Nuvo INT 50 with a custom made door and (if possible) a sliding floor for easy access to clean the sump. Lighting (Display): Two 2x24W T5 (4 total T5 bulbs) plus a Kessil A360X Lighting (Sump): 2x Tunze EcoChic 8831 Return Pump: Sicce Syncra 3.0 (maybe this is overpowered, I'm not sure if I should get the 2.5 or the 3.0) Sump: 44cm x 52cm custom made plexiglass with light-sealed refugium (see draft blueprints below) Sump Reactor: Space for a Nyos TORQ Dock + Body (I wanted to save the space to add this latter - only if necessary) Skimmer: Nyos Quantum 120 Electrical automation: Unknown Water chemistry testing method/system: Unknown Calcium/alkalinity/magnesium dosing equipment: Unknown Auto top-off: Unknown Heating/cooling: Unknown Drilled Overflows: 3x - 1” Pre-drilled “BeanAnimal” Internal Overflow [Primary Drain, Emergency Drain and Secondary E-Drain] 1x – ¾” Pre-drilled Return Hole Laser Cut Black Acrylic Weir w/ Slot Cut Rear Glass Panel Attached below is the tank (in warehouse storage before I move it into my office) and a blueprint of the sump (its just a guess, let me know if you see any issues). Looking forward to hopefully soon start aqua scaping and eventually get the cycle going!
-
If any other beginners are wondering about this topic, I got some replies on another Forum. You can see them below. In the end I decided take their good advice and just go with the regular "in-line" method, with all the same flow going through both chambers. Better to keep it simple and standard. ========== Original quote from an expert below... ==========

-
Hi all, I am a beginner. Just looking for some guidance for my sump/refugium. I was planning on having a slow flow refugium, and a high flow, area for the skimmer. Is this a good idea? Or should I just have the same flow rate through both the Skimmer zone and the refugium? If they are the same flow, then they are all connected in line. But I hear there are fun benifits to having slow flow in the refugium. If they are different flow rates, then they would need to be in separate zones, and each zone would need its own different intake (seel below), which is okay with me. To do this I have designed the sump below, I like it, but I thought I should check with the experts before I make any silly rookie errors (thanks for the guidance). BTW, I'll have a contractor build the sump to order with plexiglass. Advice is appreciated. Tank details: Planned for SPS dominated TANK: Nuvo INT 50 - https://www.marine-aquatics.eu/en/nuvo-int-int-aquarium-aps-alu-stand-black-kit-190-l?ItemIdx=1 LIGHTS: (4x24W T5 total) Two 2x24W dimmable T5 https://www.aquaristic.net/en/Light/Light-Unit-T5-T8/Giesemann-Razor-T5-dimmable.html?listtype=search&searchparam=4x24W dimmable T5& Kessil A360X (https://www.marine-aquatics.eu/en/kessil-a360x-tuna-blue-led-lighting-90w?ItemIdx=2)